Converging lenses and ray diagrams
How a lens works
- A lens works entirely by refraction. Light refracts once entering the glass and again leaving it, and the curved surfaces mean different parts of the beam are bent by different amounts.
- A converging (convex) lens is thicker in the middle. It brings parallel rays together.
- A diverging (concave) lens is thinner in the middle. It spreads parallel rays apart.
The words you need
- Principal axis — the horizontal line through the centre of the lens, at right angles to it.
- Optical centre — the middle of the lens. A ray through it passes straight through, undeviated.
- Principal focus () — the point on the principal axis where rays parallel to the axis are brought to a focus.
- A lens has a focus on each side, the same distance out.
- Focal length () — the distance from the optical centre to the principal focus.
- A fatter lens has a shorter focal length and is more powerful.
- Object distance () — from the object to the lens.
- Image distance () — from the lens to the image.
The three construction rays
To locate an image, draw rays from the top of the object. Any two of these three are enough; the third is a check.
-
Ray 1 — parallel then through the focus. A ray travelling parallel to the principal axis refracts through the lens and passes through the far principal focus.
-
Ray 2 — through the optical centre. A ray aimed at the centre of the lens carries straight on, undeviated.
-
Ray 3 — through the near focus then parallel. A ray passing through the near principal focus emerges parallel to the principal axis.
-
Where the refracted rays cross is where the top of the image sits. Drop a perpendicular to the axis to complete the image.
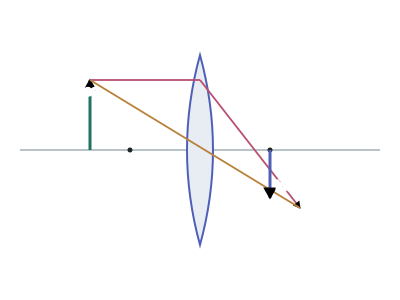
Drag the object below and watch the image move, flip and change size as it crosses the focal point:
1/f = 1/dₒ + 1/dᵢ · dₒ = 40 cm · dᵢ = 24 cm
m = −dᵢ/dₒ = -0.60 (reduced, inverted)
Drag the object.
Real and virtual images
- A real image forms where refracted rays actually cross.
- It can be projected onto a screen.
- For a single converging lens it is always inverted.
- A virtual image forms where the rays only appear to come from, when traced backward.
- It cannot be projected onto a screen.
- It is always upright.
- Draw the backward extensions as dashed lines.
The five cases for a converging lens
The image depends entirely on where the object sits relative to and :
| Object position | Image position | Nature |
|---|---|---|
| Beyond | Between and | Real, inverted, smaller |
| At | At | Real, inverted, same size |
| Between and | Beyond | Real, inverted, larger |
| At | No image (rays emerge parallel) | — |
| Inside | Same side as the object | Virtual, upright, larger |
- The one case that gives an upright image is the object inside the focal length — this is the magnifying glass.
- Everything else with a single converging lens is real and inverted.
Drawing an accurate diagram
- Draw the principal axis as a long horizontal line and the lens as a vertical line crossing it.
- Mark and on both sides, to scale.
- Draw the object as a vertical arrow standing on the axis.
- Draw two construction rays from the top of the object.
- Mark the image where they cross, and describe it in words: real/virtual, upright/inverted, larger/smaller.
- Use a ruler — the specification requires one, and marks are given for accuracy.
Worked ExampleLocating an image by drawing
An object cm tall stands cm from a converging lens of focal length cm. Describe how to locate the image by construction, and state its nature.
Step 1 — Mark the key points
cm, so is cm from the lens on each side and is cm from it on each side.
The object is at cm, which is beyond .
Step 2 — Draw the construction rays
- Ray 1: from the top of the object, parallel to the principal axis, up to the lens; then refracted so that it passes through on the far side.
- Ray 2: from the top of the object, straight through the optical centre, undeviated.
Step 3 — Find the image
The two refracted rays cross on the far side of the lens, between and . Drop a perpendicular from that crossing point to the principal axis: this is the image.
Step 4 — Describe it
Because the rays genuinely cross, the image is real. It is below the axis, so it is inverted, and it is shorter than the object, so it is smaller.
Worked ExampleThe magnifying glass case
An object is placed cm from a converging lens of focal length cm. Describe the image formed.
Step 1 — Compare the object distance with the focal length
The object is inside the focal length.
Step 2 — What the construction shows
- Ray 1 leaves parallel to the axis and refracts through the far focus.
- Ray 2 goes straight through the optical centre.
After the lens these two rays diverge — they never actually cross. Extending them backward as dashed lines, they meet on the same side of the lens as the object, further from the lens than the object is.
Step 3 — Describe the image
Because the rays only appear to come from that point, the image is virtual. It is on the same side as the object and the same way up, so it is upright, and it is further from the lens than the object is, so it is magnified.