Preparing biological material for viewing
Preparation is everything you do to biological material before it goes under the lens. Its whole purpose is to give the light a thin, flat, transparent piece of tissue to pass through, and to make the structures inside it show up.
The wet mount
A wet mount is a specimen held in a drop of water between a slide and a coverslip. It is the base method — every technique below ends in a wet mount.
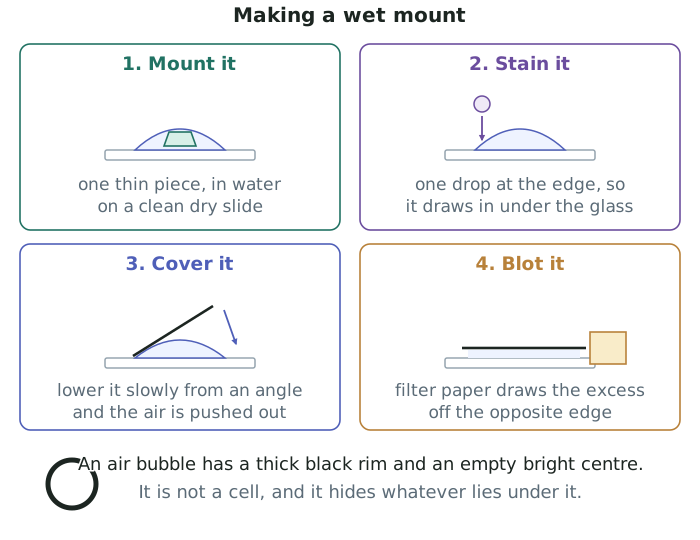
- Start with a clean, dry slide. Grease and dust both show up at ×400 and both look like structures.
- Place one small, thin piece of material in the middle, in a single drop of water. More water than that floats the coverslip and the specimen drifts while you draw.
- Add the stain, if you are using one, as a drop at one edge of the coverslip.
- Lower the coverslip slowly, from an angle, resting one edge on the slide and letting it down on a mounting needle. Dropping it flat traps air.
- Blot the excess liquid from the opposite edge with filter paper. That also pulls stain across underneath the coverslip.
Air bubbles are the commonest thing to mistake for a cell.
- A bubble has a thick black rim and a completely empty bright centre, and it sits at a different focus from the tissue.
- It hides everything underneath it, so a bubble over your specimen means remounting.
Getting the material thin enough
Which method you choose depends on what the material is like.
- Epidermal tear — snap a leaf or a fleshy scale leaf and peel back the skin. The epidermis you pull off is one cell thick, which is exactly what you want. Onion bulb and many leaves both tear well.
- Cellulose impression — paint a thin layer of clear cellulose varnish on a leaf surface, let it dry, lift it off with clear tape and mount it. It takes a print of the surface, so you get the shape and arrangement of the epidermal cells and the stomata without damaging the leaf. Use it on a leaf too tough to tear, such as harakeke.
- Cutting sections — hold the material steady and cut across it with a sharp blade, taking several slices and mounting the thinnest one. Soft material can be supported inside a piece of carrot or pith so it does not squash. Use it for a stem, a root, or a leaf in cross section.
- Cavity slide — a slide with a hollow ground into it, used for material that is alive and moving or too deep for a flat slide. Pond water goes on a cavity slide.
- Squashing — press gently on the coverslip through a paper towel to spread a thick piece into a single layer. Press straight down, never sideways, or the cells shear apart.
Stains
Most plant tissue is nearly colourless, so a stain is what makes the detail visible.
- Iodine solution stains starch grains blue-black, and gives the cytoplasm and nucleus a yellow-brown tint. It is the stain for storage tissue such as potato.
- Methylene blue stains the nucleus dark blue against a paler cytoplasm, which is what makes a nucleus countable and drawable.
- Choose the stain for what you want to show. A stain that does not bind to the structure you are drawing has only added colour, not information.
- Use one drop. Over-staining turns the whole field one dark colour and buries the outlines you needed.
- Chloroplasts need no stain — they are already green and already distinct.
Working safely and getting a usable slide
- Cut away from your fingers, on a tile or board, never in your hand.
- Take several attempts. A section is cheap; the first one is almost never the thinnest.
- Label the slide with what it is, so three slides made in three sessions do not become three unknowns.
Worked ExampleChoosing a method for three materials
You have to prepare and view two different plant tissues and one unicellular organism. Available to you are an onion bulb, a harakeke leaf, a stick of celery, a potato, and a jar of pond water. Choose a preparation method for each of three specimens and give the reason for each choice.
Step 1 — Decide what each material needs
The question to ask of every specimen is the same: how do I get a piece of this that light will pass through? The answer is different for each, because the materials are different.
Step 2 — First plant tissue: onion bulb epidermis, by epidermal tear
Snap a piece of the fleshy scale leaf and peel the thin skin from the inner surface.
That skin is the epidermis, and it is naturally one cell thick, so no cutting is needed and no cells are damaged. Mount it flat in water and stain with iodine or methylene blue, because onion epidermis has no chloroplasts and almost no colour of its own — unstained, the nucleus is invisible.
Step 3 — Second plant tissue: harakeke leaf epidermis, by cellulose impression
Harakeke has a tough, fibrous leaf that will not tear into a clean single layer, so an epidermal tear is the wrong tool.
Paint clear cellulose varnish on the lower surface, let it dry, and lift the film off with tape. The film carries an exact print of the surface, so you can see the arrangement of the epidermal cells and the guard cells around each stoma — the two features that make this tissue different from the onion.
Step 4 — The unicellular organism: pond water, on a cavity slide
Put a drop of pond water in the hollow of a cavity slide.
The organisms are alive and swimming, and a flat wet mount squashes them against the coverslip. The hollow gives them a depth of water to stay in, so they keep their shape while you look. A drop of methyl cellulose slows them enough to draw.
Step 5 — Check the choices against the material
Each choice was made from the property of that material — soft and layered, tough and flat, or alive and moving — rather than from habit.