How a light microscope works
A light microscope shines light through a specimen and uses two lenses to make an enlarged image of it. Everything about how you use one follows from that one sentence: the light has to get through, so the material must be thin and transparent.
The parts, and what each one does
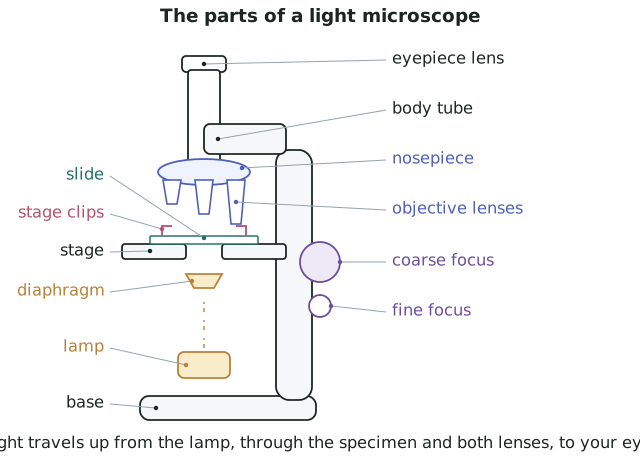
- Eyepiece lens — the lens you look down. On a school microscope it is almost always ×10.
- Objective lenses — the lenses closest to the specimen, carried on a revolving nosepiece so you can turn a different one into place. Typical values are ×4, ×10 and ×40.
- Stage — the platform the slide sits on, with stage clips to stop the slide sliding, and a hole in the middle to let light through.
- Diaphragm — an adjustable hole under the stage that controls how much light reaches the specimen.
- Lamp or mirror — the light source.
- Coarse focus — moves the stage and objective a long way relative to each other. Used only on low power.
- Fine focus — moves them a tiny amount. This is the one that brings a high-power image sharp.
How to focus, in order
The order matters, and getting it wrong is what breaks slides.
- Start with the lowest power objective clicked into place. The lowest power has the widest field of view, so you can actually find the specimen.
- Watch from the side, not down the eyepiece, while you bring the objective and the slide close together.
- Look down the eyepiece and focus by moving the objective and slide apart. Focusing this way, the lens can only ever move away from the coverslip, so it can never be driven into it.
- Centre the part you want before you change objectives. The field of view shrinks each time you go up a power, so anything not in the middle disappears.
- Turn to the next objective and use the fine focus only. School microscopes are roughly parfocal, so the image is nearly sharp already.
- Adjust the diaphragm. A high-power image is dimmer, so it usually needs more light — but an unstained specimen usually needs less, since too much light bleaches out the faint outlines you are trying to see.
What you can actually see
- Magnification makes the image bigger. Resolution is the smallest gap the microscope can still show as two separate things. A light microscope cannot resolve anything smaller than about 0.2 μm, so past that point extra magnification only gives you a bigger blur.
- You can see, in a plant cell: the cell wall, the cytoplasm, the nucleus once it is stained, chloroplasts as distinct green discs, the large central vacuole as a clear space, and starch grains once iodine has stained them.
- You cannot see ribosomes, the endoplasmic reticulum or the Golgi apparatus at all — they are below the resolution limit. The cell membrane is there but is pressed flat against the wall, so in an ordinary plant mount you see the wall, not the membrane.
- Draw only what you saw. An organelle you know is present but could not make out does not belong on the drawing.