Contours, cross-sections and photographs
What contours show
- A contour is a line joining all points at the same height above sea level. Every point on the 200 m contour is at 200 m.
- The contour interval is the height difference between one contour and the next — commonly 20 m. It is printed on the map and you should find it before reading anything else.
- Contours never cross, because a point cannot be at two heights at once.
- Closed contour rings mark a summit or a hollow. A spot height or a trig station figure inside the ring tells you which.
Reading slope from contour spacing
- Contours close together mean a steep slope: a lot of height gained over a short horizontal distance.
- Contours far apart mean a gentle slope.
- Evenly spaced contours mean a uniform slope.
- Contours that bunch at the top and spread at the bottom describe a concave slope; the reverse describes a convex slope.
- Contours forming a V that points uphill mark a valley, because the stream has cut back into the slope. A V pointing downhill marks a spur.
Drawing a cross-section
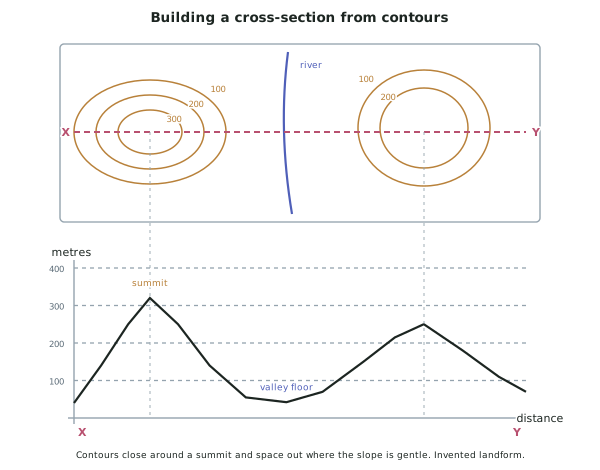
- A cross-section is a side view of the ground along a chosen line, usually labelled X to Y.
- Procedure:
- Lay a strip of paper along the line X-Y on the map.
- Mark the strip wherever a contour crosses it, and write the height at each mark.
- Draw axes below: horizontal for distance along X-Y, vertical for height in metres. Label both, with units.
- Transfer each mark to the horizontal axis and plot a point at its height.
- Join the points with a smooth line, not straight segments, because ground curves.
- Annotate the section: name the summits, valleys, rivers and any feature you were asked to identify.
- The vertical axis must start at a sensible height and be labelled. Starting at zero when the lowest point is 300 m wastes the paper and flattens the profile.
Vertical exaggeration
- Cross-sections almost always use a vertical scale much larger than the horizontal scale, or the profile would be a nearly flat line.
- This is called vertical exaggeration, and it makes slopes look far steeper than they are.
- Say so if you are describing the section. A slope that looks like a cliff on your section may be a 10 degree hillside on the ground.
The kinds of visual material
- Vertical aerial photograph — taken looking straight down. It behaves like a map: shapes and relative positions are close to true, so it can be compared with a map directly.
- Oblique aerial photograph — taken at an angle from the air. It shows relief and the sides of things, but scale shrinks with distance from the camera.
- Ground-level photograph — taken from the surface. Best for condition and texture: vegetation type, erosion, the state of a road, how new a building is.
- Satellite image — like a vertical photograph but at a much larger scale, and often used for pattern rather than detail.
Describing what a photograph shows
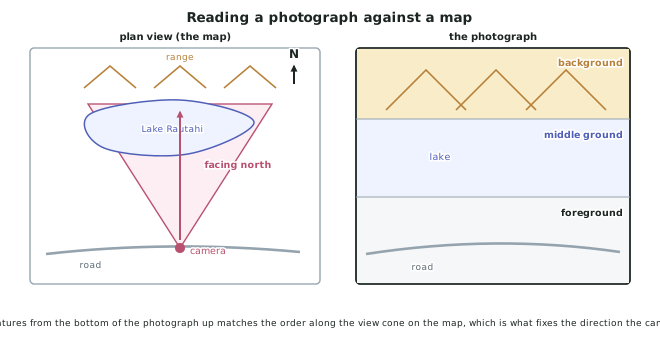
- Divide the image into three bands and describe them in order: foreground (nearest the camera, bottom of the frame), middle ground, background (furthest, top of the frame).
- Use the bands as your structure, so you cover the whole image instead of describing whatever caught your eye.
- Use compass directions if you can establish them, and left and right of the frame if you cannot.
- Describe what is there, not what you assume. A photograph shows bare ground; it does not show that the ground was cleared last year.
Working out where a photograph was taken from
- Procedure:
- Find a distinctive feature you can see in the photograph and locate it on the map — a lake, a river bend, a bridge, a peak.
- Find a second distinctive feature and locate that too.
- The camera lies on the side of those features where their arrangement matches: whichever feature appears on the left of the photograph is on the left as seen from the camera position.
- The order of features from the bottom of the photograph upward is their order in distance from the camera, so it matches the order along a line drawn out from the camera position on the map.
- Read the direction of that line off the map's north arrow, and state it as a compass direction.
- Check it with a feature you did not use. If a third feature ends up on the wrong side of the frame, the camera position is wrong.
Using a photograph as evidence
- A photograph is evidence of condition at one instant. It can prove a bank is slumping, a paddock is bare or a building is new.
- It cannot prove distance, because perspective destroys scale, and it cannot prove absence — a feature that is out of frame and a feature that does not exist look identical.
- Pair it with the map. The map says where and how far; the photograph says what it is like there.
Worked Example
Worked Example
A resource booklet supplies an invented map and a photograph of the same area.
On the map: the road runs east-west across the south of the map. Lake Rautahi lies in the centre. The Kohu Range runs east-west across the north of the map, beyond the lake. North is up the page.
In the photograph: a road runs across the bottom of the frame; a lake fills the middle of the frame; a range of hills stands across the top of the frame.
State the direction the camera was facing, and justify your answer.
Answer:
Step 1 — identify the features in the photograph and find them on the map.
Three features are visible: the road, Lake Rautahi, and the Kohu Range. All three appear on the map.
Step 2 — put them in order of distance from the camera.
In a photograph, things nearer the camera appear lower in the frame. So the order from nearest to furthest is:
road, then lake, then range.
Step 3 — find that order on the map.
On the map, the road is in the south, the lake is in the centre, and the range is in the north. Reading south to north gives road, lake, range — exactly the order in the photograph.
Step 4 — conclude.
The camera must have been on the road, looking across the lake toward the range. That line runs from south to north, so the camera was facing north.
Step 5 — check with something not used to reach the answer.
If the camera were facing south instead, the range would appear at the bottom of the frame and the road at the top, which is the reverse of what the photograph shows. The answer holds.
Note what the photograph cannot tell you. It cannot show how far the range is from the road — perspective compresses distance — and it cannot show whether anything lies behind the camera. For distance, go back to the map.
The direction, in one line: